RESEARCH & DEVELOPMENT
(FREE WORKFLOWS)
This page is from 2025 research.It remains relevant, but new research will be posted to the 2026 container.
For current research posts and workflows visit Research (2026)
ABOUT
The below is research begun in 2025 and includes free workflows. 2026 brings a change of focus toward content creation, but I will continue adding/updating research and workflows to the Research (2026) page when I get time.
To keep up to date with new research and content creation, join my Patreon (free tier) or subscribe to the YouTube channel
💻 MY 2025 HARDWARE
All 2025 research was done on a regular home PC using OSS software and models. It was running 24/7 quite often, and is still going in January 2026.
My current ethos is to work with affordable LowVRAM equipment to provide the best hope for other users who cannot afford expensive hardware.
back to top of page
Topics are presented below in alphabetical order, and not in the order videos have been made. To aid speedier page caching, videos have been hidden behind clickable grey windows.
CAMERA ANGLES
GETTING NEW CAMERA ANGLES USING COMFYUI (Uni3C, Hunyuan3D)
Click to load video
Getting New Camera Angles
Getting New Camera Angles Using Comfyui (Uni3C, Hunyuan3D)
Date: 5th September 2025.
About: This is a follow up to the video in Phantom x3 character consistency
In that video, we put 3 highwayman characters in a video clip sat together at a campfire, with highly accurate consistency of their face and clothing. What we need to get now, is new camera position shots for driving dialogue.
For this, we need to move the camera to point over the shoulder of the guy on the right while pointing back toward the guy on the left. Then vice-versa.
To do it, I use a still image from the original Phantom workflow, turn it into a 3D model, turn that into a rotating camera shot and serve it up as an Open-Pose controlnet. From there we can go into a VACE workflow, or in this case a Uni3C wrapper workflow and use Magref and/or Wan 2.2 i2v Low Noise model to get the final result, which we then take to VACE once more to improve with a final character swap out for high detail (see VACE - ADDING HIGH QUALITY CHARACTERS BACK IN TO A SHOT). This then gives us our new "over-the-shoulder" camera shot close-ups to drive future dialogue shots for the campfire scene.
It is just one method I use to get new camera shots from any angle - above, below, around, to the side, to the back, or where-ever.
Hardware: This is all done on a 3060 RTX 12 GB VRAM with 32GB system ram.
Workflows: To download the x3 workflows shown in this video right click here and download the zip file. The workflows can be found in the png files within it and you can drop them into Comfyui and they will load up. It contains the following:
MBEDIT - make-Pose-controlnet-from-video-input.pngMBEDIT - uni3c-rotate-camera-around-subject-using-Pose-controlnet.pngMBEDIT-Hunyuan3D_model_from-single-image.png
back to top of page
CHARACTER CONSISTENCY
PHANTOM WORKFLOW FOR 3 CHARACTERS (2nd Sept 2025)
Click to load video
Phantom workflow for 3 consistent characters
Workflow explainer using Phantom GGUF model to put 3 characters in a video clip and maintain consistency
Date: 2nd September 2025
About: This is the first in a series of videos where I will share my latest research into Comfyui on making short video clips for story-telling.
(Forgive the poor quality voice-over I was testing Microsoft's VibeVoice for the first time).
I am pretty excited this time as we are much closer to being able to make short films now with dialogue and believable human interaction.
Here, I share a Phantom workflow with you that takes 3 different characters and places them into a defined position according to the prompt. The important thing is they remain consistent in face and clothing. The Wan 2.1 based Phantom model can do that.
Hardware: This is all done on a 3060 RTX 12 GB VRAM with 32GB system ram.
The workflow : is embedded in the png metadata file (right-click the image and download the png file)
You can just drop the png file into comfyui and it will load up the workflow.
If you have any questions find me via the comment section of the video, or on social media via the contact page
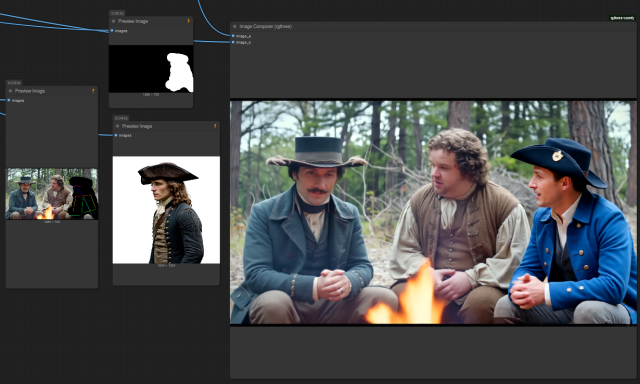
VACE - ADDING HIGH QUALITY CHARACTERS BACK IN TO A SHOT
UPDATE: this is for working with images and uses a single VACE/WAN "Low Noise" model in the workflow. For more advanced use and VACE 2.2 with video methods, see the other sections using VACE 2.2 for dual worklows. This workflow is still relevant for base image work - Mark, 15th October 2025.
Click to load video
VACE Swap High Quality Characters Back in To New Camera Angles
VACE Swap High Quality Characters Back in To New Camera Angles (Image Version)
Date: 6th September 2025
About: Using VACE to Add High Quality Characters Back in To New Camera Angles (Image Version)
This follows on from the two previous videos where we got 3 guys sat around a campfire then rotated the camera position to get "over-the-shoulder" shots ready for making dialogue scenes.
What we now want is to revisit the quality of the characters in those new camera shot positions. And we add them back in at higher quality using VACE model. Yes, we are using VACE here as an image workflow, not a video workflow.
Low VRAM: The trick here for the low VRAM guys, is to use it to create the base image, we are not using it to swap a character back into a video (that comes later). What this means is we can hit higher quality 720p output which gives us decent quality character shot ready for the next step, which is driving the dialogue.
I provide an updated workflow below that uses a superior method to grey masking, but you can switch it back to use whatever method works for you. I'll leave the workflow below setup with it so you can try it. It uses a black mask outline with openpose instead of the usual grey mask (grey mask was shown in the video but I used the open pose on black silouhette method). This then goes into the input frame of the VACE encode node, same as grey mask would. I found this way allowed Wan 2.2 to do its magic even better, and got me the best results. I forgot to mention it in the video, but you can see what I mean in the image of the workflow png file below.
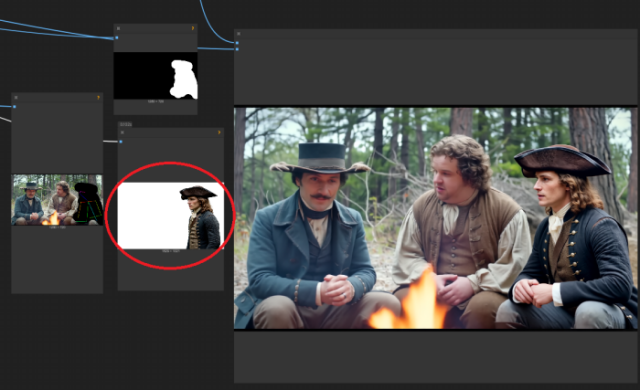
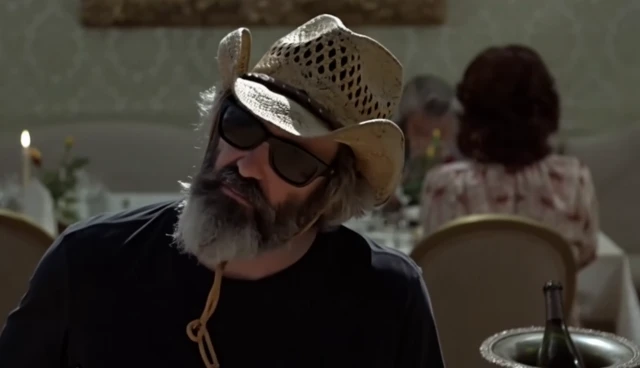
Masking issues: The below images highlight the importance of the reference image position (character with white background). If the ref image guy is in the wrong place, VACE will add it's own idea based on the prompt. The difference as you can see, is huge. Many are not aware of this aspect, and might not realise how good VACE is when you can get this right, only how bad it is when you don't.
The above is when it goes wrong. I got Brokeback Mountain cowboys because VACE wasn't happy with the position of the ref image so it only used the prompt.
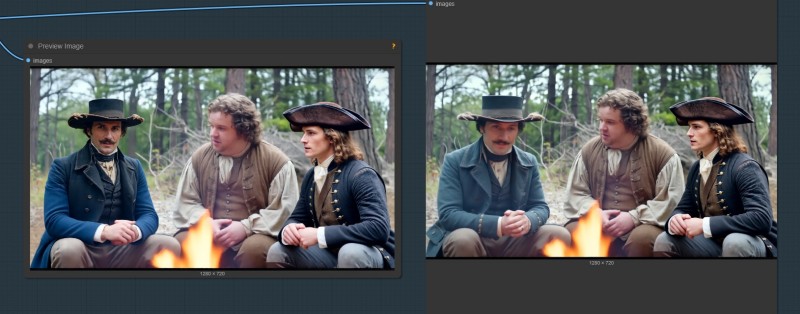
Discoloration issues: The other thing to be aware of is poor colour matching (see the arms of his jacket on the left of the below image). I dont recall what I did to fix it, but it works fine in the updated workflow.
The workflow: The VACE Character swap-out workflow is embedded in the png file below. Right-click the below image to download it, then drop it into ComfyUI.
Further VACE research: To learn more about what VACE can do I highly recommend looking through this NotebookLM from Nathan Shipley
back to top of page
COLORISATION
THE COLORISATION PROCESS AND WHEN TO APPLY IT
I realised from feedback that it was time to explain why I am not that bothered about contrast blow-out or perfect clips at this stage of the AI movie making process.
Click to load video
The Colorisation Process And When To Apply It
The Colorisation Process And When To Apply It
Date: 30th October 2025
About: In response to some feedback about low resolution results and colorisation contrast blow-out in clips. It was time to explain why it is less important at this stage.
To do that we firstly need to understand what the "Colorisation" process is, where it is applied when making movies (which is what I am all about) and also why we should not be trying to get color "pop" in our clips but rather, when the time comes, go for neutral color strengths now, even if we want the Final Cut to look like "Blade Runner" or "Dune".
This is where we finally start to cross over into the world of film-making. And there are issues with that. Luckily Colorists mostly seem to be accepting of AI, while film-makers generally seem less accepting of it.
Regardless this video spends the first 4.30 minutes discussing and addressing the points brought up in some "constructive feeback" to my post on VACE restyling. The rest of the video goes on to explain what Colorisation is, how it effects us in AI, or will when the time comes, and ways to start understanding it now.
I recommend seeking out Cullen Kelly for "Colorisation" tutorials, as his tutorials provide some of the best I have seen on it, and he comes well recommended in colorist circles.
It's one of the "black arts" of movie making and the last process in the chain. If you are interested in making AI movies then at some point in the future you will need to understand it, even if you get others to do it.
Here is a quote from "Sushi Ravioli" I copied from a reddit post regards the "scopes" used in Davinci Resolve to analyse color of any video clips.
I rarely ever look at the histogram when colour grading. The waveform, RGB parade and vectorscope are where it's at.
Waveform: lets you analyse objectively the luminance and contrast. It represent the light intensity from left to right (the left area of the scope actually corresponds to the left area of the frame). Put a black-to-white gradient in your app, and the waveform will be a diagonal line from the lower left to the upper right. Play around with the lift-gamma-gain controls and pay attention to what happens to that line. Try different images and note the kinds of patterns that are generated in the waveform monitor.
The waveform is useful for matching the luminance and contrast of multiple shots. Use it to set your black levels. Typically, all shots within a single scene should have the same black level, which is how low the signal gets on the waveform. Go from one shot to the next while looking at the waveform. Are the black levels at the same height? If not, adjust the lift on the problem shots. If there are very light areas in your shots, such as a sky, match the top-most part of the scope by adjusting the gain.
RGB Parade: This is simply 3 waveform monitors side-by-side, one for each colour channel. Does it look like your image has tinted blacks? Look at the RGB Parade: if the bottoms of the signals don't fall in the same place, just adjust your shadows colour balance until they do. Unless you want tinted blacks, of course. You can do the same for your highlights and midtones, but only if you believe these should be neutral. If the lightest area of the frame is the sky, then it is perfectly normal for the blue channel to be higher than the others.
Vectorscope: Gives you an idea of overall saturation and tint. Anything that spreads from the centre is tinted and the further it goes, the more saturated that colour is. The direction of the spread indicates the tint. No part of the signal should ever go past the small boxes (B-C-G-Y-R-M). If the whole signal is off to one side, then that tells you there is a colour cast. Maybe that tint is desirable, so don't neutralise it entirely, unless you want a very dull looking image.
The sky is typically a Blue-Cyan mix. You can easily identify which part of the vectorscope corresponds to the sky. If it's too blue or too cyan, it will look wrong. Adjust your highlights colour balance until it looks right both in the preview and the vectorscope. Skintones looking off? Take a look at the vectorscope to see if they are indeed too red or too yellow. - Sushi Ravioli
back to top of page
COMPOSITING
Compositing is taking a small part of a video clip, fixing that section at a higher resolution usually by replacing it with part of another one, and blending it into the original video clip. Compositing two into one.
The problem: Working on low VRAM means we dont often hit 720p - the coveted resolution for WAN models - and working in cinematics this means faces-at-distance often look terrible.
If our aim is consistent characters, then Upscaling wont work, because we lose face consistency in the process.
The solution: The solution is compositing. Though it has a big cost on Time + Energy, for now it is one solution to maintain consistent character features for fixing faces-at-a-distance on Low VRAM GPUs.
If you find other solutions, especially faster ones, please let me know.
SHOTCUT + WANIMATE + DAVINCI RESOLVE
Click to load video
Compositing in Comfyui - Maintaining Multi-Character Consistency
Compositing in Comfyui - Maintaining Multi-Character Consistency
Date: 10th October 2025
About:
NOTE: Wan animate is proving to be very useful, the workflows can be downloaded from Wanimate section. - Mark Jan 2026
There are at least two other approaches that could be used instead of Wanimate - VACE and "Stand-In". Let me know if you hear of any others.
Pulling the composite out of the original video clip for each character is quick and easy with Shotcut (video editor). Just use a scale filter and zoom in so the character does not leave the frame, but is enlarged as big as you can make it. Don't worry about the blur. Exporting out from Shotcut to .mp4 hasnt created contrast or lossy problems using the method I describe here.
Run the Shotcut exported mp4 composite for each character through Wanimate replacing the face. Try to target only the face with the mask as blending will be easier later if no clothing is changed, but it can work fine if that isnt working out.
Wanimate tends to have blocky masking (in this older wf, not if you use SAM3) which works best if characters are far enough apart. VACE can be more targetted - e.g. if you have two people close together in the shot - but it has its own drawbacks. Stand-In I havent tested much, but might work too.
Wanimate is very good at pushing consistency into low res composites. However, on my 3060 RTX I cannot get over 1024 x 576 resolution with Wanimate, which seems to be the minimum resolution required for it to work well. In fact, I sometimes have to blur the result to make it sit in the context of the original clip better, so going to a higher resolution may be of little value. 576p is good enough, but takes 30 minutes to composite 81 frames at 16 fps.
Take the original video into Davinci Resolve and then layer the fixed composite video clips over the top. Use zoom and opacity to move them into position covering the original. Then use the "composite" settings for the clip, along with "cropping" and "soften" to blend it into the original shot. If it is to perfect it might not blend, so add some blur. If the camera is not static then keyframing the crop for each composite is easier than setting up tracking, but either method will work. I can do 4 character composites into a shot and export it out in under 20 minutes if there are no problems. This method works surprisingly well.
In many shots I have 3 or 4 subjects and each has to be addressed seperately. Given the cost on Time and Energy for compositing that, whatever is quicker is going to be of value. This area is currently one of the worst aspects for LowVRAM, as it compounds the losses making visual story-telling on LowVRAM potentially too long to justify, since there are many times middle-distance shots are going to be necessary for cinematics.
Higher VRAM cards can achieve 720p and more, so they are less likely to run into the problem. Having said that, I can achieve 720p on my 3060 with VACE 2.2 dual model FFLF (first-frame, last-frame) workflows, but it didnt solve middle-distance shots at all. It's worth noting that during my testing of Upscaling solutions to fix faces-at-distance I had to go to 1600 x 900 before I saw face-at-distance be fixed with t2v model "detailer/polisher" methods.
back to top of page
CONTROLNETS
BLENDER FOR COMFYUI - TIPS, TRICKS, & CONTROLNETS
Click to load video
Blender for Comfyui - Tips, Tricks, & Controlnets
Blender for Comfyui - Tips, Tricks, & Controlnets
Date: 16th September 2025
About: There are a few approaches we could take, but this video is specifically for people who, like me, do not know how to use Blender.
In it, I take a 2D image, convert it to a 3D model with Hunyuan3D, and then use that in Blender to make a head swivel, which in turn gets converted to an Open Pose model. Both those workflows I share below.
I also mention use of the Grease Pencil in Blender, and ways to work with Blender using Co-pilot, so that you don't really need to know how to use Blender at all, you just ask Co-pilot as you work with it to get to an end result.
It is all about using cheap and dirty tricks to get the job done as fast as possible, so that we get what we need to drive ComfyUI to give us results. In this case for dialogue scenes so the man looks in the right direction while he is talking. In this instance we use "Vibe-Blendering" to achieve it.
The workflows: I share two. One is to make a Hunyuan3D model from a 2D image and is quick and easy. The other is to turn a 3D short grey model animation clip (made in Blender) into an Open Pose clip for use as a controlnet, and is also very quick.
Right-click and download the below png files and drop them into ComfyUI to load up the workflows contained in their metadata.
The above is Hunyuan 3D model from 2D image workflow
The above will convert a video clip animation of a person (such as saved out of Blender in the video example) to an Open Pose clip that can be used to drive a controlnet based workflow such as posing characters with Lipsync.
back to top of page
EXTENDING VIDEO CLIPS
SKYREELS DF MODEL EXTENDING CLIPS
Click to load video
Skyreels DF model for Extending video clips
Skyreels DF model for Extending video clips
Date: 23rd September 2025.
About: This Skyreels DF model workflow takes an input video, and after setting the frame overlap, will use those as start frames to create a continuation video of 97 frames. This can then be extended further using the same approach for two more clips.
The problem is that color and quality degradation occurs the more clips created, and this is a common issue with these methods. However, this workflow is fast even on a 3060 RTX, finishing each set in around 7 minutes where similar WAN methods took 30 minutes or more.
In the video example above, it works well enough to provide an "extended pine forest fly-over sequence" of four 121 frame clips (including original video clip of 121 frames) that are then over-laid in Davinci Resolve to line up and create one long sequence.
It's not perfect but the approach creates the video structure that could be restyled or re-detailed easily at a later date, or rent a more powerful server GPU and run an upscaling detailer process on it.
It is a good example of where the AI solutions are not yet available locally in OSS, so we have to look at workarounds. We could also spend time blending the seams and fixing color degradation issues in Davinci Resolve, or simply create the underlying struture now, and wait for the solutions to arrive in time.
In this case I will do the latter. What it does is enable me to test the flow of the opening shots so now I can add the narration to it and get a feel for how it flows. I will circle back around later to fix the clips when better AI solutions arrive. Turning them to depthmap sequence and restyling, or rent a server and upscale it with a detailer.
If you know of other solutions that will run on Low VRAM cards, feel free to send them on.
Workflows: Right-click and download the SkyReels DF extension video workflow image png file below, then drop it into ComfyUI and it will load the workflow.
The other Skyreels workflow shown in the video is Skyreels i2v with Uni3C workflow to drive the camera. Right-click and download the image png file below, then drop it into ComfyUI and it will load the workflow.
back to top of page
FFLF
(First-frame, Last-frame)
720P FFLF USING VACE 2.2 & WAN 2.2
Click to load video
720p FFLF using VACE2.2 + WAN2.2 on 12 GB VRAM GPU
720p FFLF using VACE2.2 + WAN2.2 on 12 GB VRAM GPU
Date: 18th September 2025.
About: In this video we achieve 1280 x 720 x 81 frames for the first time in a single run on a 3060 RTX 12GB VRAM GPU.
What is interesting about it, is that it not only includes FFLF using VACE, but uses controlnets to drive the result. So this is not a basic workflow, and it came as I surprise to me that it even finished on a 3060 RTX, I'll be honest. What's more, this is a Wan 2.2 dual-model workflow.
The reason for this success is explained in the video, but I am using fp8_e5m2 scaled models for both Wan 2.2 and VACE 2.2 and doing this has resolved some issues I had with GGUFs. I'd also had issues when mixing different types of VACE and WAN models together. This suggests to me there is a lurking problem, as I am seeing others run into road-blocks too. Something for devs above my paygrade to figure out.
Here we have it working, and working very well. And note that this is using 19GB in file size per model load. This throws out the myth that a 12GB VRAM card can only load a model file smaller than 12GB. True in native workflows, maybe, but in wrapper workflows I have been able to work with larger sometimes. This video proves that to be the case.
I have only just got this working, but in the opening line from one of my favourite novels by Bukowski, "it began as a mistake". I would never have tried this if other models had not been behaving strangely.
I share this workflow "fresh off the press" though the FFLF workflow has been around a while and I'd long ago promised a video on it. So the timing was perfect, since I'd planned to share the 832 x 480 version and related bump-up stages to fix the results, but having a 720p version allowed me to get rid of all all that.
One slight CAVEAT: When I first tested this workflow I got 720p x 81 frames done in 30 minutes. In the video example it takes 47 minutes. That is because I had restarted Comfyui and it was loading up fresh. A second run should be closer to 30 minutes.
After completion, I ran the 720p resulting video clip through a "16fps to 24fps" interpolation workflow, then through the 1080p Upscaler/Detailer USDU workflow, then finally reversed the video using Shotcut. And the result of that is ready to go to Davinci Resolve for the Final Cut.
Updates: "Radial Sage Attention" didnt work out due it having resolution constraints, I either had to drop resolution or go up to 1280 x 768 which I tried but it didnt finish. And though FastWAN shaved off 5 minutes from total run-time using it on the Low Noise model, in comparison to end result without, I felt it lost quality so wont use it. And for the record, in further tests once the first run is completed I am finding it finishing around 30 minutes each subsequent go, so it is keeping some of the models in memory enough to save a fair bit of time. Around 8 minutes is spend decoding latents, so another reason why I am researching Latent Space next.
Workflows: Right-click and download the FFLF workflow image png file below, then drop it into ComfyUI and it will load the workflow.
For the other workflows mentioned in the video - the "16fps to 24fps" interpolation workflow is in the INTERPOLATION section, and the Upscaler workflow can be found in the UPSCALING section.
back to top of page
INTERPOLATION
16fps To 24fps
Date: 17th September 2025.
About: In Footprints In Eternity I tried to get as smooth a result as possible and targetted 60fps or 120fps in some cases.
Since then I have learnt that in cinematics the public actually prefer 24fps. And since my interest is not high-quality gamer perfection but is decent story-telling narrative at 720p or 1080p, then I no longer need to target those higher frame rates. Which suits me fine. It was a PITA anyway, because 5 seconds at 120fps is 600 frames.
The problem to solve is that Wan models work to 16fps. So how do we get from 16fps to 24fps smoothly?
It is actually pretty easy. We use RIFE or GIMM to interpolate the 16fps x3, which gives us 48fps. We then use a node to apply "use every 2nd frame" and that gives us the end result of 24fps, but done using a properly applied mathematical approach.
Why do we do it this way? So that we don't skip over frames and end up with jumpy video. I do not know how Topaz works to go from 16fps to 24fps and havent tried it. Given the Comfyui process is very fast even on a 3060 RTX GPU, I might not even bother reaching for Topaz during this stage.
For the record, I plan to use the following steps when going for production ready results:
- Work in 16fps to get best quality video clip that I can. Resolution is 720p if I can do it, less if not.
- 16fps to 24fps interpolation. But before I do this, I use a ComfyUI native node to upscale it quickly to 1080p
- I then take that 1080p at 24fps into a USDU upscaling workflow (30 mins on average) and it cleans up any artefacts at a low denoise setting.
- I now have a finished result and that will go to Shotcut to reverse the action if that is required, and to Davinci Resolve for colorisation and Final Cut edit.
If the above changes, then the workflow below might need to change, but for now that is my planned process when going from image, to video, to production ready clips.
Workflows: Right-click the below workflow and save it as a png file then load it into ComfyUI for the workflow.
back to top of page
LATENT SPACE
LATENT FILES & FIXING LONG VIDEO CLIPS ON LOW VRAM
Click to load video
Latent Space - Part 1 - Latent Files & Fixing Long Video Clips on Low VRAM
Latent Space - Part 1 - Latent Files & Fixing Long Video Clips on Low VRAM
Date: 25th September 2025
About: In the video I discuss the "Secret Society of Latent Space" and why it is hard to crack. There isnt much info out there on working in Latent Space with video clips, and almost no workflows available.
In this video I share how I used it to test upscaling and detailing of a low-quality 32-second long extended clip made in ComfyUI using SkyReels DF workflow in the previous episode. You can download that workflow from the Extending video clips section of this page.
Now, I use a Latent Space workflow and file loading methods to fix the seams and add structural detail into the 32-second-long clip by breaking it into 120 frame long parts.
It was a good first test going from 480p to 720p to add the detail back in subtly while helping to fix the continuity. In this case using Phantom t2v model in a wrapper workflow to do it. I will do more videos on working in Latent Space as I master the art.
The workflow: Right-click on the below png image and save it. Drop it into Comfyui and it will load the workflow. NOTE: The automation part does not currently work and I have not found any help to resolve that yet. I will share updates here as I resolve them.
Also note that to load latent files you will need to manually move them to the Comfyui input folder.
back to top of page
LIPSYNC
InfiniteTalk (with FantasyPortrait) and Wanimate are my main Lipsync workflows going into 2026. (Workflows for both are shared in this section)
LongCat-AVATAR I have tested, it takes too long, but it is very good. It can't use WAN speed up loras, so until it's faster I wont share the workflow.
SVI 2 Pro with HuMO is also good especially for extending shots, but it's lack of prompt adherance make it of less value to me at this time. I'll keep an eye on it though.
HuMO on its own is good but I havent found it to beat my mainstays.
Some other contenders that need further testing: OVI, Mocha, LTX-2, S2V
DIALOGUE - PART 1 - INFINITE TALK (Audio To Video)
InfiniteTalk using audio files to drive the video and lipsync in an image-to-video workflow.
Click to load video
Dialogue - Part 1 - Infinite Talk
Dialogue - Part 1 - Infinite Talk
Date: 7th September 2025
About: In this episode we open with a short dialogue scene of my highwaymen at the campfire discussing an unfortunate incident that occured in a previous episode.
It's not the best lipsync approach but it is the fastest. It uses a Magref model and Infinite Talk along with some masking to allow dialogue to occur back and forth between 3 characters.
In previous episodes I created five or six camera position shots: in front of the three men, close up over the shoulder from two directions, and some not-so-close up camera positions. Some worked and some didn't. They are utilised in the first part of the video so you can see how that went, and then discussed in the second part.
I used VibeVoice to make short text-to-speech audio clips. I used Audacity to trim audio and boost levels when needed. I used silent audio clips along with masking and prompting, to stop other men talking.
All of this I took into Davinci Resolve to add some sampled "meadow ambience" to create a cohesive sound bed. I could have done a lot more like color masking and reverb over the entire thing, but I would only do that for a production finish. This example was just goofing around to see what could be done, but it works well enough. The 1.5 minute of video dialogue took about a day to complete.
Infinite Talk is pretty good, and I let it roll for a 10-second-long clip which took 20 minutes on my 3060 RTX 12 GB VRAM at 832 x 480 and 25fps.
But this approach has inherent weaknesses. I'd use it as a test run for its speed and probably use some of the results in a final and could probably get a way with it. Though this was just to show what could be done.
Part 2 will be about using video controlnets to drive the lipsync and the facial expressions, which should give better control over the results, but of course, takes more time.
The workflow: The infinite Talk workflow with Masking is provided below. Right-click on the png image and save it. Drop it into Comfyui and it will load the workflow.
back to top of page
DIALOGUE - PART 2 - INFINITE TALK + UNI3C, UNIANIMATE, FANTASY PORTRAIT
InfiniteTalk by itself is an i2v workflow driven to lipsync from an audio file (mp3 or flac). The below offer additional ways to work with InfiniteTalk.
Uni3C is for camera control, UniAnimate is for pose control, and Fantasy Portrait is for landmark of face and lipsync by using v2v, thus providing a way to restyle an existing lipsync video clip using a new person.
(FYI, I find I only really use or need InfiniteTalk so far, but I share the extras in this workflow anyway. Wanimate is superior to FP, and can provide pose control too.)
Click to load video
Dialogue Part 2 - Infinite Talk with Uni3C, UniAnimate, and Fantasy Portrait
Dialogue Part 2 - Infinite Talk with Uni3C, UniAnimate, and Fantasy Portrait
Date: 17th September 2025
About: In "Dialogue Part 1" I looked at Infinite Talk on it's own. In this video I discover what does, and doesnt work with Uni3C and UniAnimate, then go on to show how powerful Fantasy Portrait with Infinite Talk can be.
When I start my next project I will likely switch between using Infinite Talk on its own and with Fantasy Portrait. I like them both. Infinite Talk provides a certain randomness to the human movement which is often unexpected and works.
-
Fantasy Portrait requires providing everything - the video, the lip movement, the spoken word, the pace of delivery, and the acting. This is going to be useful when I want more control over subjects behaviour and acting. Especially useful since it can be driven by a cheap android phone video recording and it doesnt get confused by my Darwin sized beard, it guesses the chin-line very well.
-
Uni3c is about camera movement and I plan to look into "spline control" for managing that. An interesting example is available here that I have yet to test.
-
UniAnimator is for pose control and you need to provide realism as it locks tight on the human movement you give it, so you need to provide realism else it looks very stiff.
I explain the pros and cons of all that in the video. It is possible you can mix some of these methods but I haven't tried.
If you have any questions on useage then contact me via my contact page. I will do my best to help.
Pre-requisites: This runs on my 3060 RTX 12GB VRAM. I also have pytorch 2.7, Sage Atten 1, and CUDA 12.8 installed. If you dont have those things it might be that causing issues, so confirm that first before contacting me with any concerns on workflow useage. (NOTE: at this time pytorch 2.8 is known to have some problems, either downgrade to 2.7, or upgrade to 2.9)
The workflow: The workflow contains all 4 methods and a switchable option, and may seem complicated but should be clear from the video. I left all my notes in it should you run into problems, but you can delete them otherwise.
Download the workflow from the png below by right-clicking and saving it. Then drop it into ComfyUI and the workflow should load.
back to top of page
WANIMATE
A full video explainer for using Wanimate will be released soon. But the workflows are available to download for free below.
Video coming soon
Date: 12th January 2026
Update: SAM 3 has memory leak and you should bypass it when doing main run. See wf notes. But there is something else not right with the 2026 workflow causing GPU "blap" after runs complete when being run again. Workaround is to close and re-open the browser after a run. You need to monitor it with proc-exec64 or something so you know when it is happening. (solution may be adding --disable-pinned-memory switch to the ComfyUI start-up batch file, seems to have reduced the problem for me). - 17th Jan 2026
About: Wan Animate (or Wanimate) is a powerful tool and works like VACE. However, where VACE cannot accurately replicate or create lipsync (and I have tried), Wanimate is excellent at it.
Wanimate can replace clothing, objects, faces, people, styles. It is driven by creating a controlnet pose reference from a source video. You also need to provide a reference image of the item or person you want to swap into the video (which is done using video masking).
You can target individual things with the masking to swap them out, but its not the only approach.
You can also use Wanimate to restyle entire video clips, and longer ones too, assuming you have the time to wait (my 3060 RTX GPU does 220 frames, 15 seconds long at 16 fps, in about 30 mins).
There are two ways to completely re-style a video clip using the reference image:
-
The hard way: make a totally white video as a mask it will swap out the entire video with your reference image.
-
The easy way: unplug the background image and the mask from the "WanVideo Animate Embeds" node, and it will use pose and face lipsync from the driving video with the reference image.
Either way works, and this means it can serve as a restyling workflow, as well as v2v lipsync and pose swap of individual characters.
Wanimate will work with FantasyPortrait which offers landmarking the face to grab the lipsync, but so far best results have come from using Onyx controlnets to rip lipsync (and pose) from a source video. (Ironically, I found FantasyPortrait offers a good way to stop a person's lips moving, if that was desired).
But that is not all - you can also drive acting. Since you can seperate the pose from the face landmarking lipsync it means you could record yourself talking on a phone, then seperately record yourself posing, acting, moving, and use both those seperate videos to drive a new "restyled" video with final result - acting and talking - done by a character defined by the reference image, with the talking and movements driven from your video recordings. I will show this in more detail in an upcoming video.
Regards masking:
-
SAM3 improves on the older masking but with a few caveats - it causes memory leak.
-
SAM2 is provided in the second, older, workflow and doesnt suffer the memory leak problem.
Workflows: I provide here two workflows. A recent one (Jan 2026), and the older one that I was using in 2025. Both are viable and it will depend on your install which you choose to work with.
back to top of page
MASKING
VACE 2.2 - EXTENDING VIDEO CLIPS
Click to load video
VACE 2.2 - Part 1 - Extending Videos
VACE 2.2 - Part 1 - Extending Videos
Date: 11th October 2025
About: VACE is a powerful tool and I call it the "Swiss Army Knife" of Comfyui for good reason.
Read Nathan Shipley & Adrien Toupet article to find out more about the early form uses for VACE 2.1 that they shared in the notebook. It will give you a good grounding on some of what VACE can do.
In this video I discuss VACE 2.2 in a WAN 2.2 dual model workflow and use it for extending a video clip to drive 81 new frames using just 17 frames from the end of the previous clip. I use a prompt to inform VACE what I want in the 64 remaining frames.
I then overlay the output in Davinci Resolve to produce the final result from both clips.
It's the first time I used it for this purpose, and was surprised at how good the results were, so will be testing it further.
We need two kinds of frames when masking - middle grey images define the replacement frames. But for the actual masking we need black and white frames. VACE treats black frames as frames to be ignored, while white will be overwritten by VACE.
Along with prompting this gives us some powerful tools, with some caveats around expectation (I will discuss those another time).
This workflow is based on the FFLF VACE+WAN 2.2 dual model workflow I shared in the FFLF section but has additional nodes for the masking tasks mentioned.
NOTE: I have only completed the first video on "extending" with VACE and will have to return to this in 2026 if something new doesnt replace the method. So for now, I will only add the x1 extension video & workflow, and will post the rest here in the future - Mark, 11th October 2025.
Workflow: To download the VACE 2.2 WAN 2.2 dual workflow for extending video clips shown in this video, right-click the below image and download the png file then drop it into Comfyui to load the workflow it contains.
back to top of page
VACE 2.2 - INPAINTING WITH CAVEATS
VACE is amazing but has a tendency to create contrast burn, especially when running a video through a workflow a few times to swap out multiple characters. Masking works, but doesnt protect against it. As such, consider whether Wanimate might be a better tool for the job.
Click to load video
VACE 2.2 - Part 2 - Inpainting with Caveats
VACE 2.2 - Part 2 - Inpainting with Caveats
Date: 11th October 2025
About: In this video I show how inpainting works to add in a missing shadow under a horse. I then show why this isnt the best approach for adding new items into existing video clips. I do this using a bear, while showing a variety of approaches we can use to tackle VACE.
Finally I include fixing an extended video clip where there was jarring on a seam, a roaming campfire, and wandering trees.
This video explores some of the caveats and issues with video inpainting and explains its strengths and weaknesses in this context.
A future video will address inpainting to replace targeted subjects with VACE 2.2, but if you want a VACE 2.1 workflow that can do it, see the "Footprints In Eternity" workflow download link.
Workflow 1: To download the VACE 2.2 WAN 2.2 dual workflow used to target the horse shadow, right-click on the below image and save it as a png file, then drop it into comfyui to load the workflow it contains. Use the video as reference for setting up your own video masks to inpaint parts of frames as opposed to entire frames.
Workflow 2: To download the VACE 2.2 WAN 2.2 dual workflow for fixing jarring seams, roaming campfires, and wandering trees in video clips, right-click the below image and download the png file then drop it into Comfyui to load the workflow it contains. You may want to watch the video in VACE 2.2 - Extending Videos as it uses the same workflow and nodes for extending a video as for inpainting a section of video.
Both the above workflows are based on the workflow used in FFLF but have nodes changed to suit the task at hand. They are all very similar to each other. The video shows a variety of additional approaches you can take with this workflow if you wish to experiment.
A future video will address inpainting to replace items in videos (though Wanimate might prove a better tool to use for replacing something in a video, depending on your needs).
back to top of page
VACE 2.2 - CHARACTER SWAPPING
If I want i2i character swapping, I can use VACE (in a WAN 2.2 workflow) with output frames set to 5 (a video is just packed images after all).
But for video character swap-outs, now I consider Wanimate as an alternative, especially if there is lipsync that needs to be maintained.
Click to load video
VACE 2.2 - Part 3 - Character Swapping & Replacing Objects
VACE 2.2 - Part 3 - Character Swapping & Replacing Objects
Date: 14th October 2025
About: In this video I show how to use SAM2 points editor, or Florence 2 text description to target a person or object with a mask, then replace the masked target using a reference image. This works very well.
One minor drawback is first frame flashing that occurs in VACE 2.2 with reference images but most of the time if done correctly this only happens during the High Noise model stage and is fixed during the Low Noise pass.
If that doesnt work, try changing the seed, changing the prompt, or making sure the reference image is roughly in the same position as the target being masked in the first frame. This is another common aspect of VACE 2.1 and 2.2 that helps the VACE node do a good job, but isn't always mentioned in tutorials on VACE.
Workflow: To download the VACE 2.2 WAN 2.2 dual workflow used to target a person or object for replacement, right-click on the below image and save it as a png file, then drop it into comfyui to load the workflow it contains. Use the video as reference for using the two approaches offered in the workflow for masking the video.
back to top of page
MEMORY MANAGEMENT
UPDATE: The t5 Text Encoder mentioned in the video on the YT channel has been superceded by the "T5 WanVideo Text Encoder Cached" node. See notes below for updated info - Mark, 25th September 2025.
Click to load video
Memory Tricks in Comfyui for Low VRAM GPUs
Memory Tricks in Comfyui for Low VRAM GPUs
Date: 25th September 2025
About: Getting everything running on a 3060 GPU 12GB VRAM with 32GB system RAM has its challenges. In the video above I shared a few memory tricks that helped me get Comfyui working with less OOMs and better workflow capacity on a 3060 RTX 12 GB VRAM with 32GB system ram on a Windows 10 PC.
This came about after Wan 2.2 dual model workflows got released, and all I was getting was OOMs and Blue Screens (BSOD). These tricks sorted it out, and I've kept with them since. They might work for you too.
UPDATE (25th Sept 2025): Since making this video I looked into why I wasn't getting the results I expected with the "T5 Text Encoder" approach mentioned in the video. The below is the updated approach, and the node I will be using moving forward.
I had the opportunity to ask Kijai about the issue with t5 nodes and got this response:
"use this node. that's the only node that fully unloads it from RAM too."
I then asked him about the movie director you see in the screen shots below, and he said this:
"it's the official prompt enhancer yea dunno if it's good, just added it to match the original if wanted needs either of those models - https://huggingface.co/Kijai/WanVideo_comfy/tree/main/Qwen
it doesn't take any VRAM or RAM from the model inference when used with the Cached -node"

I will be using the above in all wrapper workflows from now on and I will be loading it into the GPU not the CPU but will test results of switching between on taxing workflows. The below screenshot is why I will be using this t5 cached node version.

As you can see the "sharkfin" effect is where it loads the t5 and then drops it. but better still on the left of the screenshot above you can see it is creating a cache of the prompt. So if you do not change your prompt and do not delete that cache then it doesnt need to load the model on the next run, it will use the cached copy.

The above is the "movie director" that I also asked Kijai about. It puts the result into the windows command prompt so needs cut and paste from there to tidy up, but I wont be using it myself so that will remain unplugged in my workflows.
FYI, if you don't see the t5 "WanVideo Text Encoder Cache" node being used in my future videos, it is only because I forgot to swap it in.
back to top of page
RE-STYLING
Consider whether Wanimate might be a better tool for the job. Restyling videos with or without lipsync is now easy with Wan Animate.
VACE 2.2 - RE-STYLING
Click to load video
Re-Styling with VACE 2.2 Using Controlnets
Re-Styling with VACE 2.2 Using Controlnets
Date: 28th October 2025
About: In this video I use VACE 2.2 in a WAN 2.2 dual model workflow in Comfyui to restyle a video using a reference image. It also uses a blended controlnet made from the original video clip to maintain the video structure.
The workflow is the same as used for FFLF and in some other VACE related workflows, but is setup specifically for the task of creating the controlnet from the original video clip, then running it through VACE nodes with a single reference image for style, and the depthmap with pose blend controlnet for the structure.
Workflow: To download the VACE restyling workflow right-click on the below image, or use the download button and save the png file. Drop it into Comfyui and it will load the workflow.
back to top of page
SHOT MANAGEMENT
To be kept up to date with latest approaches and tutorials on shot management and making AI movies follow my Patreon (Free tier)
I will be talking more about shot management in 2026 as narrative story-telling becomes more relevant to what we do. Managing shots and takes is not something people think about until they run into the problem.
I developed AIMMS Storyboard Management application for this exact reason. However, CSV tracking is good enough to start with, and I talk about it in this video.
Click to load video
Shot Management & Why You Will Need It
Shot Management & Why You Will Need It
Date: 30th September 2025
About: In this video I discuss the importance of shot management and offer a csv approach solution. I also discuss what information to keep in csv columns that will help in making a film cohesive, as well as what I no longer consider useful.
These are lessons I learnt on "Footprints In Eternity" which was a 10 minute narrated noir that took me 80 days to complete.
Despite only being 120 shots in length "Footprints" was still difficult to manage because each shot often had 5 or more good takes (and sometimes dozens of discarded ones) and there were lots of images and videos to keep track of.
Now we are able to make lipsync, dialogue, and extend video clips, we are rapidly moving into an area where movie-making is going to be possible on local machines. Without good shot management, we will run into problems. A full length feature film will require hundreds of shots and maybe x10 times that number in take files that need to be tracked (AIMMS Storyboard Management software has been tested with 600 shots and 21K takes).
I only talk about the csv and basics in this video, but will be using AIMMS Storyboard Management in future video projects to manage my shots and takes better. This will provide instant storyboarding which will replace the csv approach (I use the csv approach initially then migrate it into AIMMS using a migration tool).
back to top of page
SLOW MOTION
SMOOTH SLOW MOTION FOR CAMERA ZOOM-IN SHOTS
This is specifically for making buttery-smooth slow motion for camera shots that zoom slowly in toward an object in the centre of the frame without changing trajectory.
Click to load video
Slow Motion Smooth Zoom-in For ComfyUI
Slow Motion Smooth Zoom-in For ComfyUI (Discussion video)
Date: 20th September 2025
About: I use ComfyUI FFLF workflow shared in the FFLF section of this page. This makes 81 frames at 16 fps and a 5 second long video clip.
I take that to a "16fps to 24fps" interpolation workflow shared in the Interpolation section of this page, and that also upscales the clip to 1080p.
At this point it looks okay, but on closer inspection you will see problems with things like trees and branches. We solve this next by pushing the 1080p 24fps 5 second video clip through the USDU detailer workflow you can find on the Upscaling section of this page.
We are nearly there. But we have two things left to do.
Firstly we use Shotcut to motion interpolate the video from 24fps to 120fps. Do this right by the video above, and you will not see any quality loss.
We then take the result into Davinci Resolve 20 (free version, but be aware of commercial caveats if you don't buy it). In Davinci Resolve we work in a 24fps timeline, and there we right-click our imported video, slow it down by 4 or 5 (from 120fps) to a reasonable 24fps speed, which also makes our 5 second clip run for nearly 20 seconds.
We have just one last trick to play, and that is using re-time in Davinci Resolve (also a free feature) to set re-time process and motion expression to the highest settings we can.
And we are done. We now have a butter-smooth 20-second long 24fps video clip of a slow-motion camera zoom-in.
NOTE: YouTube degrades the quality of videos, below is the final clip. 20 seconds long in 1080p @ 24fps:
20 second final clip of Slow Motion Smooth Zoom-in For ComfyUI
back to top of page
UPSCALING
Click to load video
1600x900x49 frames example workflow Comfyui
Detailed discussion on using the Upscaler workflows shared below.
UPCALING TO 1600 X 900 X 81 FRAMES ON LOW VRAM GPU
Date: 10th September 2025
About: Not many people realise, but even on a low VRAM card such as the 3060 RTX 12GB VRAM GPU, we can now take a video clip that looks like this:

and with a simple t2v workflow set to low denoise, end up with a video clip that looks like this:

Both of the above are screen shots from a video clip created at 480p and fixed and upscaled to 900p in ComfyUI using the below upscaler workflow on a 12GB VRAM GPU.
Admittedly my use case is slightly different, because I need to maintain character consistency when applying the upscaling process, and I talk about how in the video at the top of this section.
Workflow: To download the 1600x900 x 81 frames upscaler workflow used in the above shot, right-click the image below, save it as a png file, and drop it into ComfyUI
UPSCALE A 1080p VIDEO CLIP USING "ULTIMATE SD UPSCALER"
Date: 10th September 2025
About: This is a recent find from user "Muri-Muri" on Reddit, so I havent had much time to test its potential but I share it here anyway as promised in the video at the top of this section.
It could probably do the work of a complete upscaling restyler or fix faces at distance, but I tested it as a polisher workflow to give an existing 1080p 24fps 5 second video clip a final touch.
I share it here as-is, and so far only got it to 65 frames not to 81, but using low denoise of 0.08 meant I was able to run through the same video twice doing 65 frames each time start and end.
I then used Shotcut to join the two clips back together to get the final 1080p 24fps 5 second clip but with extra polish. All this on the 3060 RTX 12GB VRAM. Bigger VRAM cards will finish it in one go with ease.
The workflow ran in 20 minutes to 65 frames, but struggled with 2.5 hours for 81 frames on my rig, hence the split frame approach in two goes then piecing it together in Shotcut with no visible seam due to the low denoise used. I'll address getting it down to a one-shot run in the coming weeks.
I will update this section as I discover more about what this workflow can do, and put it through its paces. The important thing here, is it gives us access to the USDU (Ultimate SD Upscaler node) which is a go to for me when fixing and improving images. We can, with this worklow, now apply USDU to video clips.
( UPDATE NOTE: I managed to get 1080p x 121 frames @ 24fps out of this in one go in 30 minutes by changing the steps to 2, and tiling height and width to 512 x 512. Play around with that tiling will make a difference.)
Workflow: Download the USDU upscaling workflow from the below image by right-clicking, saving it as png file, and dropping it into ComfyUI. Let me know what you figure out.
back to top of page
USEFUL SOFTWARE
100% open source software (actually Davinci is not OSS, but is free with licensing caveats)
-
ComfyUI (Flux, Wan 2.1, VACE, FFLF, inpainting models, Upscalers, Interpolation) I use the portable version.
-
RVC for narration voice training and swap of my voice. Note: I have since started using Chatterbox and VibeVoice which are excellent text-to-speech tools and RVC might no longer be needed because of them.
-
VibeVoice is the fastest, free, MIT license, TTS I ever tried. It's amazing. I used it on all my videos in 2025. This is the Enemyx-Net version which is superior to the others I tried. You only need 10 to 30 seconds of voice audio, and with it you can create a believable podcast with the voice. It also does multiple voices and can create from text files. Incredible.
-
Krita + ACLY plugin – Inpainting and upscaling base images. image editing tasks.
-
Reaper DAW – Storyboarding with shot names and timecode rendered to MP4. I also used it for Narration, Foley, and Music. Mixing levels before taking it to Davinci for Final Cut. Reaper gave me far more granular power on the audio mix and is good for basic video duties.
-
Audacity - general audio file management duties; chopping out silence, changing format from wav to mp3, etc...
-
Shotcut - great as a fast fix for individual video clips: Stabilising, cropping, editing, masking, mirroring, reversing, colour and light control.
-
Davinci Resolve 20 – Final cut and colour grade
-
LibreOffice – Tracking shot names, prompts, colour themes, fixes, takes, etc.
-
Notepad++ - with the markdown plugin. I use markdown for project tracking and cross-platform compatibility. (I use Kate for editing markdown in Linux. Markor and ReadEra on android phone)
-
Kopia for auto-backups on Windows.
-
Free File Sync for manual backups.
-
Syncthing for sharing data between computers and phones. This is useful for project development as an alternative to Dropbox but needs careful management, it works differently. (I left Dropbox due to their AI data sharing policy concerns)
-
Python - I use VSCode for python coding over-night batch runs of Comfyui API workflows. I used Eleventy & Tailwind to develop this website. (I recently migrated away from React and NextJS).
-
Blender. I use Blender for animation duty, camera movement, and have plans to use the "grease pencil" feature for making 3D camera motion tracks, but havent had time to try that yet. I like it. But it is yet another thing I have to learn to use, and my feeling is in time that it won't be needed. AI prompting will do everything. We shall see.
-
Unreal Engine. I wanted to use UE for environment locations as I really liked what it did for me in Fallen Angel Music Video but... isnt there always a but... Firstly, UE is not good with animations imo. It is hard work. Secondly, its just so bloated and large to install I can't even fit it on my drives any more. So, I wont be using UE but I would if I could. Again, I think it will become obsolete in time as AI replaces it with a prompt. That is just my view.
-
Cascadeur. This software is also amazing for animation of bodies using human physics. It even has gravity physics, and you can pull a person around realistically by single points on their body, the rest of the body responds how a human would. It is by far the most useful human movement animation tool I used. But, it has licensing constraints, so although it is free to use, it is licensed. Something to be aware of, but I highly recommend checking it out.
back to top